Material List
- Lumber 2 total 1”x8”x8’
- Table saw
- Circular saw
- Wood glue
- Propane torch
- Polyurethane
- Clamps
- Dremel
- Stars stencil
- Optional: brand stamp
Step 1: Choose a Size
Here at 612 Milling, we have three different sizes for our flags we make. Our smallest size is 24” long, and 13” tall. Medium is 36” long and 19.5” tall. And out largest is 48” long by 26” tall. If you are seeing a trend that is because you’re right. There are 13 strips in the flag. In the smallest flag, each strip or rip is 1” wide. Medium is 1.5” wide and the large is 2” wide. 13”, 19.5” and 26”. Two feet long, three feet long and four feet long. I have found this to be the most simple way to remember the dimensions of the flag.
Step 2: Gather Materials
Once you have determined the size of flag you want to make, write down the amount of lumber you need. For this example, I am making a medium sized flag (36”x19.5”). For the flags we use 1” (actual: .75”) by 8” (actual 7.25”) by 8’ long. I try not to go any bigger than 8” or 10” because it has a greater chance of warping or bending. We will need 2 1”x8”x8’ boards. You can pick up this type of lumber at a Menards, Home Depot, Lowes, or your local lumber store. 0
Step 3: Make your Cuts
Unless you have a bigger platform for your table saw, I would recommend cutting down the length of the board to 3’ sections if you are doing the medium size. If you do this, you will have 4 1”x8”x36” boards. After that step, set your table saw to your rip width. For this job, 1.5” wide. Run your boards through the table saw to get at least 13, 1.5” rips. We like to cut a couple extras in case there is any bad rips or warping. We suggest at least 15 rips.

Step 4: Burning
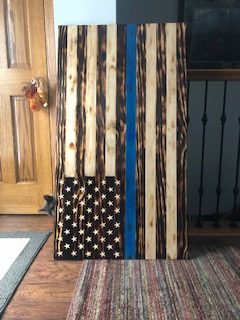
After you have all of your rips ready to go, lay them out into 13 strips. Move around any of them that do not fit close to perfect and find where each rip should go. It takes some playing around with and moving pieces to find the best place possible for each. You want to try and eliminate any gaps between rips. If not done so, there may not be a tight bond in the glue. After you got all the rips where you want them it is time for the fun part, burning the wood. Start at either the top or bottom of the strips and take every other rip. You will burn the “red” strips of the flag. Try burning on a scrap piece first to get the feel of your torch and how hot it can get. We like to give it a nice even burn but not scorching the wood. This will give the wood a nice dark color but still have amazing grain of the wood popping out. Burn every other rip for a total of 7 rips. We then take our stars stencil and find the length of the union. We line up the stencil to the end of the rip, and mark where the union end. You will only have to do this for three rips in the top left of the flag. We then take a scrap piece of wood, line it up to the mark you made, and burn up to it. Here at 612 Milling, we light to burn the union a little more than the rest of the flag because it will be darker for when we sketch out the stars. People are most interested in seeing the stars rather than the grain when it comes to the union. After this step is finished, it should look something like this:

For this project, I am doing a blue line for a customer of mine. I take the 8th strip down from the top and paint it blue.

Step 5: Gluing
Get ready with your glue bottle and at least 3 clamps. We like to flip up each rip except for the top one and put a generous line of glue along each rip. Go back through and spread the glue with either your finger, brush, etc. so the glue is along the whole side of the rip. Flip them back down and start to push them together. Try and get at least one side, if not both, all even down each side. This will save time later cutting a straight each to make it uniform. Push all the rips together and clamp them tight. Make sure all the rips are close to being as level as possible together. You do not have to over tighten the clamps. Doing this can lead to bowing. You can also stop this by putting weights on it. We use cinderblocks. Wipe away any extra glue seeping up through the top. You can get the back after it is dried. Let the flag sit for at least a couple hours for the glue to bond together with the wood.

Step 6: Sketching the Stars
After you let the glue sit for a couple hours, take off the clamps and grab the stars stencil. If you have a CNC it will make this process go a lot quicker. At the moment, 612 Milling does not have one so we do this step by using a Dremel. Tap down the stencil and use a pencil to draw out each star. After all are traced, take the stencil off. If you have never used a Dremel before, grab a scrap piece of wood and do some practice stars. After you get the hang of it, go ahead and carve the stars on the flag.
Step 7: Touch Ups
After all of the stars are carved out, go back and take a look at all of them. Make sure they are all clear and straight lines. 612 Milling also likes to go back with the torch and lightly darken the stars and lightly darken the “white” strips. The reason we like to darken the “white” strips is because the heat pulls out more of the grain that you would not see if it was left alone. Just a light brush over works to get a light brown in the grain. Also, we like to burn all four edges of the flag. Doing this will darken the sides, and makes it look more clean when its on the wall. 612 Milling also has a brand logo that we put on the back of each project we do.
Step 8: Add a Finish
After everything is done, its time to put on a finish. We use a gloss polyurethane, but you’re welcome to use a semi-gloss or statin. Be generous while putting it on. We usually put a coat on front and sides first, let it dry, then seal the back. Let the poly try and add a few coats. 2-3 coats works best.
That’s all there is to it. Very simple, easy project to do that is not that expensive. Make one for yourself or make them for other people. Once you get a couple made, you can start playing around with different designs in the union.